How to Integrate Progressive Web Apps (PWAs) into Shopify: A Step-by-Step Guide with Free Open-Source Code
Progressive Web Apps (PWAs) are transforming how Shopify stores deliver mobile experiences, offering a seamless blend of speed, functionality, and offline capabilities. In this guide, we’ll show you how to integrate a PWA into your Shopify store using our free open-source project. Whether you’re looking to enhance user engagement or set the stage for a native mobile app, our step-by-step instructions will help you make the most of this powerful technology.
Services discussed
- Shopify Theme Design & Engineering services ,
- Websites ,
- Front-end Engineering ,
- GitHub
Technology discussed
- JavaScript ,
- Liquid
In our previous post on Progressive Web Apps (PWAs) for Shopify, we explored how PWAs have evolved to become a vital stepping stone for Shopify merchants looking to enhance their mobile experience. Now, let’s take a practical dive into how you can implement PWAs in your Shopify store using our open-source project. This guide will walk you through the integration process, providing you with all the tools you need to create a basic PWA on your Shopify store — for free!
Why Integrate a PWA into Your Shopify Store?
PWAs offer a unique blend of speed, functionality, and accessibility, providing Shopify merchants with a mobile experience that closely mimics native apps. If you haven’t already read our previous article, here’s a quick reminder of the benefits PWAs bring to Shopify stores:
- Offline Capabilities: Customers can continue browsing products even without internet connectivity.
- SEO Benefits: Unlike native apps, PWAs can be indexed by search engines, increasing your store’s visibility.
- Cost-Effective Development: No need for separate apps for iOS and Android; a single codebase covers all.
For a deeper dive into these benefits, check out our full breakdown in the previous post here.
Introducing Our Open-Source PWA Integration Project for Shopify
To make the implementation of PWAs more accessible for Shopify store owners, we’ve developed an open-source project that provides a straightforward way to integrate a basic PWA setup into your Shopify store. Our solution focuses on simplicity, requiring minimal adjustments to your existing Shopify theme while unlocking powerful PWA features.
Key Features of Our Open-Source PWA Solution:
- Easy-to-Implement Code: No need for advanced technical skills. Just follow our guide to get started.
- Offline Support: Ensure your customers can access your store even when they’re offline.
- Customizable: The code can be easily modified to fit the specific needs of your Shopify store.
Step-by-Step Guide to Integrate a PWA in Shopify
The project is organized to mirror the Shopify theme file structure. Here’s a breakdown of the folders and files you’ll find in the GitHub repository:
/assets
    ├── manifest.json.liquid
    ├── service-worker.js.liquid
/sections
    ├── pwa-install-button.liquid
/snippets
    ├── application.liquid
/config
    ├── settings_schema.json
Follow these steps to set up a PWA on your Shopify store using our open-source project:
1. Create the manifest.json.liquid File in the Assets Folder
- In your Shopify admin panel, go to Online Store > Themes > Actions > Edit Code.
- Open the assets folder and click on Add a new asset.
- Upload the
manifest.json.liquidfile from our GitHub repository. - Save the file.
2. Create the service-worker.js.liquid File in the Assets Folder
- While still in the assets folder, click on Add a new asset.
- Click on Create a blank file.
- Select
js.liquidas file extension and name this fileservice-worker. - Copy the following code and paste it into the newly created file :
// Service Worker: Caching Strategy

// Define the cache name
const CACHE_NAME = 'v1_cache';

// List of URLs to cache
const urlsToCache = [
  '/'
  // Add additional URLs and assets here
];

// Install event: Cache static assets
self.addEventListener('install', event => {
  event.waitUntil(
    caches.open(CACHE_NAME)
      .then((cache) => {
        return cache.addAll(urlsToCache)
          .then(() => {
            self.skipWaiting()
          });
      })
      .catch(error => console.log('Failed to cache', error))
  );
});

// Activate event: Clean up old caches
self.addEventListener('activate', event => {
  const cacheWhitelist = [CACHE_NAME];
  event.waitUntil(
    caches.keys()
      .then(cacheNames => {
        return Promise.all(
          cacheNames.map(cacheName => {
            // Delete old caches not in the whitelist
            if (cacheWhitelist.indexOf(cacheName) === -1) {
              return caches.delete(cacheName);
            }
          })
        );
      })
      .then(() => {
        self.clients.claim() // Claim control of the page
      })
  );
});

// Fetch event: Respond with cached content if available
self.addEventListener('fetch', event => {
  event.respondWith(
    caches.match(event.request)
    .then(response => response || fetch(event.request)) // Return cached response or fetch from network
  );
});
- Save the changes.
3. Create the application.liquid Snippet in the Snippets Folder
- Open the snippets folder in your Shopify theme.
- Click on Add a new snippet and name it
application. - Copy the following code and paste it into the newly created
application.liquidfile :
{% comment %}
  Renders progressive web app related meta tags and links.

  Usage:
  {% render 'application' %}
{% endcomment %}

{% if settings.enable_application_mode %}
  <!-- Application name meta tags -->
  <meta name="application-name" content="{{ settings.application_name }}">
  <meta name="apple-mobile-web-app-title" content="{{ settings.application_name }}">
  <meta name="apple-mobile-web-app-capable" content="yes">
  <meta name="apple-mobile-web-app-status-bar-style" content="default">

  <!-- Splash screen link -->
  {% if settings.application_splash_screen != blank %}
    <link rel="apple-touch-startup-image" href="{{ settings.application_splash_screen }}">
  {% endif %}

  <!-- Theme color meta tag -->
  <meta name="theme-color" content="{{ settings.application_theme_color }}">

  <!-- Link to the web app manifest -->
  <link rel="manifest" href="{{ 'manifest.json' | asset_url }}" type="application/json">

  {% unless request.design_mode %}
    <script>
      // Register the service worker
      if ('serviceWorker' in navigator) {
        navigator.serviceWorker
          .register('{{ 'service-worker.js' | asset_url }}')
          .catch((error) => console.log('Service Worker registration failed:', error));
      }

      {% if settings.application_show_button %}
        (()=>{
          // Check if the PWA is already installed
          if (window.matchMedia('(display-mode: standalone)').matches || window.navigator.standalone) {
            return console.log('PWA is already installed.');
          }
          // Listen for the beforeinstallprompt event
          window.addEventListener('beforeinstallprompt', (event) => {
            event.preventDefault(); // Prevent automatic prompt
            let installPromptEvent = event; // Store event for later

              // Show custom installation button
              const installButton = document.querySelector('.application-button');
              if (!installButton) return;
              installButton.removeAttribute("hidden");
              installButton.addEventListener('click', () => {
                installPromptEvent.prompt(); // Show the prompt

                // Wait for the user to respond to the prompt
                installPromptEvent.userChoice.then((choiceResult) => {
                  if (choiceResult.outcome === 'accepted') {
                    console.log('PWA installed successfully.');
                  } else if (choiceResult.outcome === 'dismissed') {
                    console.log('PWA installation rejected.');
                  }
                  installPromptEvent = null; // Clear the prompt event
              });
            });
        });
        })()
      {% endif %}
    </script>
  {% endunless %}
{% endif %}
- Next, open the layout folder in your Shopify theme and open
theme.liquidfile. - Search for
{{content_for_header}}, paste the following code to render the application.liquid snippet:
{% render 'application' %}
- Save the changes.
4. Merge the settings_schema.json Configuration in the Config Folder
- Open the config folder in your Shopify theme.
- Locate the existing
settings_schema.jsonfile and open it for editing. - Copy the following configuration settings:
{
   "name": "Application",
   "settings": [
     {
       "type": "checkbox",
       "id": "enable_application_mode",
       "label": "Enable Application Mode",
       "info": "This will enable progressive web application in your store.",
       "default": false
     },
     {
       "type": "text",
       "id": "application_name",
       "label": "Application name",
       "default": "PWA Shopify APP"
     },
     {
       "type": "image_picker",
       "id": "application_icon",
       "label": "Application icon",
       "info": "This icon will be used for the application icon on the home screen."
     },
     {
       "type": "image_picker",
       "id": "application_maskable_icon",
       "label": "Application maskable icon",
       "info": "This icon needs to support a variety of shapes and must not have a background."
     },
     {
       "type": "header",
       "content": "Colors"
     },
     {
       "type": "color",
       "id": "application_theme_color",
       "label": "Application color",
       "default": "#1c1c1c"
     },
     {
       "type": "color",
       "id": "application_background_color",
       "label": "Background color",
       "default": "#ffffff"
     },
     {
       "type": "header",
       "content": "Splash screen"
     },
     {
       "type": "image_picker",
       "id": "application_splash_screen",
       "label": "Splash screen",
       "info": "This image will be used as the splash screen when the application is launched."
     },
     {
       "type": "header",
       "content": "Installation button"
     },
     {
       "type": "paragraph",
       "content": "This enable a button to your store to install the application on the home screen of your customer's device."
     },
     {
       "type": "checkbox",
       "label": "Show installation button",
       "id": "application_show_button",
       "default": true
     },
     {
       "type": "header",
       "content": "Application shortcut"
     },
     {
       "type": "paragraph",
       "content": "This will add a shortcut to your application on the home screen of your customer's device."
     },
     {
       "type": "text",
       "id": "application_shortcut_name",
       "label": "Shortcut name",
       "default": "Best Sellers"
     },
     {
       "type": "url",
       "id": "application_shortcut_link",
       "label": "Shortcut link"
     },
     {
       "type": "image_picker",
       "id": "application_shortcut_icon",
       "label": "Shortcut icon",
       "info": "This icon will be used for the application shortcut on the home screen."
     }
   ]
 },
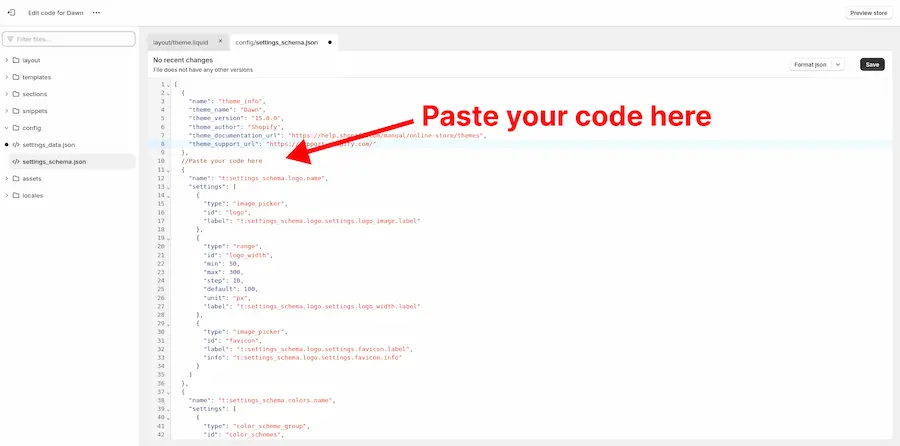
- Paste the copied content into the appropriate location in your theme’s settings_schema.json file. Ensure that the pasted code is inserted properly within the existing JSON structure to avoid any syntax errors.

- Save the changes.
5. Check for New Settings in the Shopify Theme Editor
- In your Shopify admin panel, go to Online Store > Themes > Customize.
- Click on gear icon on top left of you screen then click on Application from the dropdown menu.
- In Application you need to enable Application Mode and fill the necessary settings such as
Application name,Application icon,etc. Make sure to save your changes.
Next, open a browser that supports PWAs. You can find a list of supported browsers here.
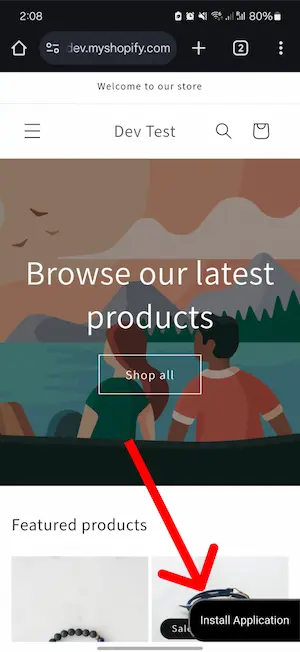
Open your store in the browser, and you should see the option to install the PWA.
For detailed instructions on installing the PWA on an Android device using Chrome, check out this guide
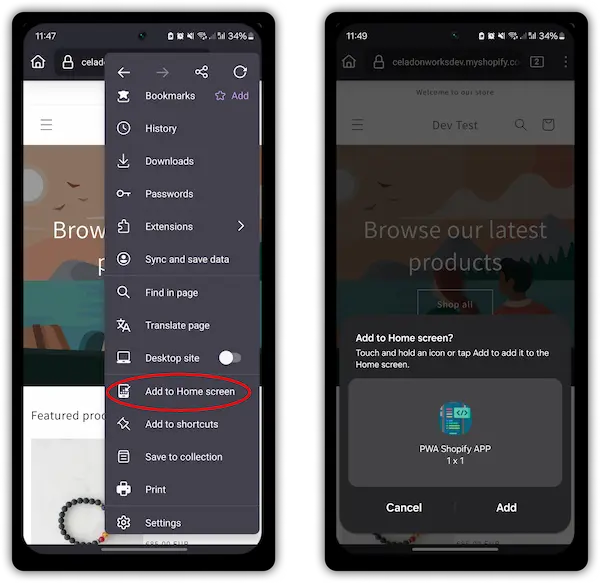
Here’s another example of installing a PWA using Firefox on an Android device:

6. Create the pwa-install-button.liquid File in the Sections Folder
One of the biggest obstacles for PWAs is that many users are unaware of how to install them. We can tackle this issue by adding an install button that can be customized with CSS.
- Navigate to the sections folder in your Shopify theme.
- Click on Add a new section, select
liquidas file extension and name itpwa-install-button. - Copy the following code and paste it into the newly created file :
<style>
  .application-button{
    position: fixed;
    bottom: 0;
    right: 0;
    padding: {{section.settings.spacing}}px 12px;
    background-color: black;
    color: white;
    border-radius: 20px 0 0 20px;
    z-index: 999999999999999;
    cursor: pointer;

  }
</style>
{% if section.settings.button_label != blank %}
  <button
    type="button"
    class="application-button" hidden>
    {{ section.settings.button_label }}
  </button>
{% endif %}

{% schema %}
{
  "name": "PWA install button",
  "settings": [
    {
      "type": "text",
      "id": "button_label",
      "label": "Button Label",
      "default": "Install Application"
    },
    {
      "type": "range",
      "id": "spacing",
      "min": 0,
      "max": 80,
      "step": 4,
      "unit": "px",
      "label": "Vertical Spacing",
      "default": 16
    }
  ],
  "presets": [
    {
      "name": "PWA install button"
    }
  ]
}
{% endschema %}
Save the changes. Next, to add the PWA install button to your theme:
In your Shopify admin panel, go to Online Store > Themes > Customize.
In Header click on Add section, then search for PWA Install Button and click on it.
You have few settings that you can customize, and you can also add your own settings in the
pwa-install-button.liquidfile.Save the changes.
7. Test Your PWA Installation
Now that you’ve added the PWA install button, it’s time to test its functionality.
- Open a browser with PWA support. You should see the install button that you just added.
- Clicking on the install button will prompt you to install the PWA.

- test your PWA using tools like Google Lighthouse to ensure it’s functioning as expected.
Benefits of Using Our Open-Source PWA Solution for Shopify
- No Additional Costs: Unlike developing native apps, integrating our open-source PWA is entirely free.
- Rapid Deployment: You can implement this PWA solution in your Shopify store in under an hour.
- Future-Proof Your Store: With PWAs gaining support across all major browsers, you’re setting your store up for long-term success.
Conclusion
Integrating a Progressive Web App into your Shopify store is a game-changer for enhancing mobile user experiences, driving engagement, and improving conversion rates. With our open-source project, you now have the tools to make this transition smooth and cost-effective. We encourage you to explore the possibilities of PWAs as a stepping stone toward a fully native app and keep your Shopify store at the forefront of mobile innovation.
For more detailed instructions and to get started with your PWA integration, check out our open-source project here and revisit our previous blog post on the benefits of PWAs for Shopify.

We'd love to work with you
Have a chat with one of our co-founders, Adam or Ahmed, about how CeladonWorks can support your Shopify experience.
Contact us